Introduction and Settings for Custom API
The Custom API connector acts as an All-In-One (AIO) as it allows you to interact with any API![]() Application Programming Interface (API).
Application Programming Interface (API).
As each API is different and thus requires specific settings, the interface of this connector is generic.
To define an API, you only need to upload the API Profile file (.apip extension) and/or Tables (.rsd files) and specify the Properties (connection strings) by manually adding them through the Additional Connection Properties section.
Authentications
Authentications are related and specific to the APIs, so you will have to choose among these three values: None, HTTP (Basic), OAuth2.
Here is the list of known properties:
| Property Name | Definition | Value | Connection String | Used for |
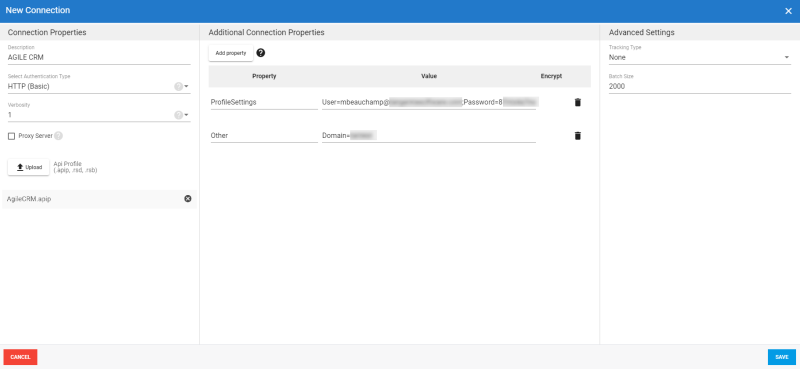
| ProfileSettings |
A semicolon-separated list of name-value pairs required by your chosen data source. Format: Key1=Value1;Key2=Value2 |
User PasswordDomain
|
|
Authentication set to HTTP (Basic) |
| Other |
In most cases, this is used with all API providers and is similar to the ProfileSettings property. Format: Key1=Value1;Key2=Value2 |
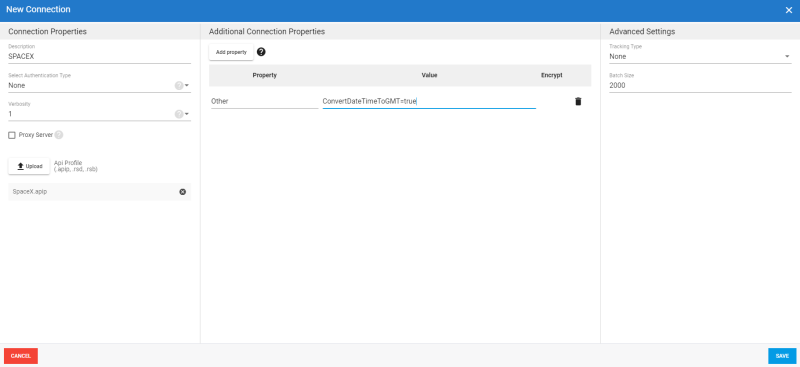
DefaultColumnSize: Sets the default length of string fields when the Data Source does not provide column length in the metadata. The default value is 2000. ConvertDateTimeToGMT: Determines whether to convert date-time values to GMT, instead of the local time of the machine. RecordToFile: Records the underlying socket data transfer to the specified file. |
|
Authentication set to None, HTTP Basic or OAuth2 |
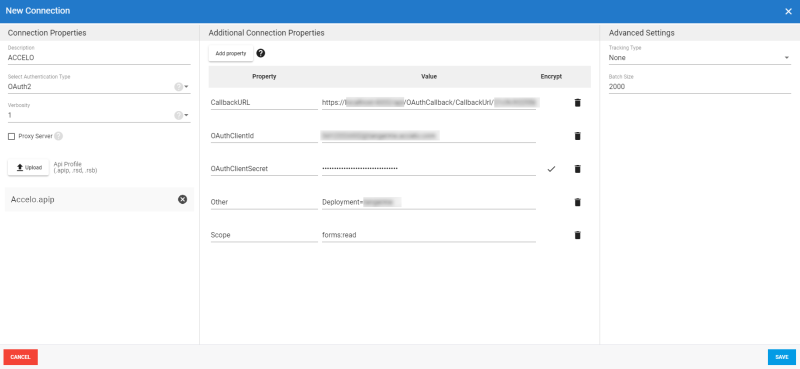
| OAuthClientId | The Client ID assigned when you register your application with an OAuth authorization server. | Acts as the User value | |
Authentication set to OAuth2 |
| OAuthClientSecret | The Client Secret assigned when you register your application with an OAuth authorization server. | Acts as the Password value | |
Authentication set to OAuth2 |
| CallbackURL | The OAuth Callback URL to return to when authenticating. This value must match the callback URL you specify in your app settings. | URL address | |
Authentication set to OAuth2 |
| Scope | Defines the specific actions applications can be allowed to do on a user's behalf. | Forms | |
Authentication set to OAuth2 |
To customize an API Profile, refer to Customizing your API or follow the procedure described below to use an API default profile and its related tables.
Settings for Custom API
To set up a Custom API:
- In the Connection page, click on New to create a new Source Connection.
- In the list, select Custom API.
- In the Description field, enter a name (preferably related to the API you want to connect to).
- In the Authentication drop-down list, select the authentication method used by the API. Here, we select None because we are connecting to a public Web API (i.e., no credentials are required to display / retrieve data from the URL).
If you select HTTP (Basic), refer to Authentication set to HTTP (Basic) to continue the configuration with this authentication method.
If you select OAuth2, refer to Authentication set to OAuth2 to continue the configuration with this authentication method.
- Click on Upload to browse to the location where the API profiles are stored, Select one of them then click on Open.
- Change the other settings (Tracking type etc.) according to your preferences and click on Save to finish.

Authentication set to HTTP (Basic)
If you select HTTP (Basic) as an authentication method:
- Click on Add property to add the properties and values required for the authentication of this connection to the API.
- Click on Upload to browse to the location where the API profiles are stored, select one of them then click on Open.
- Change the other settings (Tracking type etc.) according to your preferences and click on Save to finish.

Authentication set to OAuth2
If you select OAuth2 as an authentication method:
- Fill in the OAuthClientId and OAuthClientSecret fields located under the Additional Connection Properties section.
- Click on Upload to browse to the location where the API profiles are stored, Select one of them then click on Open.
- Change the other settings (Tracking type etc.) according to your preferences and click on Save to finish.

As presented in the screenshot above, you can use the Additional Connection Properties section to include parameters such as API Key through the ProfileSettings property name.
| Property Name | Value | Connection String |
| ProfileSettings |
API Key |
|